Saturday, May 28, 2016

What's Up Now?

Just a quick note to let you know that Beach Bird Eclectics is now on Twitter (@BeachBirdMakes), as well as Facebook Beach Bird Eclectics
https://www.facebook.com/Beach-Bird-Eclectics-736947369780150/.

I'll get the buttons up and running soon.  In the mean time, just follow the Facebook link above.

Ordering options:
This website
Twitter
Instagram
Facebook

See ya!!

Monday, May 23, 2016

Storm Preparedness


Summer has officially/unofficially arrived as of Memorial Day, and with the warm weather comes the threat of storms.  No matter where in the world you live, storms can have a great impact on your life.  In my area of Florida, we can see anything from torrential rain to hurricanes (thankfully, though, we have been spared a direct hit for the past sixty-some odd years). 

Last year I did a little bit of planning, but nothing too detailed.  This year, though, I have scoured Pinterest for the best ideas for making it through a natural disaster.  Check out my board, Storm Preparedness to help you get your emergency plan in place.  It even has a pin for packing for pets!

What about you?  Are you prepared to weather a storm?  Leave a comment and let me know what you do to prepare!
Amanda

Sunday, May 15, 2016

Just...Wow...

That's about all I can say about the last few weeks.  Just...wow! 
I have been super busy with work, the flu hit us hard,  room parent stuff, and then food poisoning.  Ugh!  Enough already!  I'm ready for a vacation!
So, needless to say, this is just a check-in post.  I know I promised I would have the kitty crochet pattern ready, but I haven't had a second to get it done! 
Please stick with me, though, and I should have it done in a couple of weeks. 
Thank you for sticking around!  Here's hoping I get a moment to breathe sp I can get some blogging done!
See ya!

Sunday, May 8, 2016

Beach Bird's Garden Update


Um, yeah.  I should probably let that photo speak for itself, huh?

Needless to say, the garden didn't go quite as planned.  I planted the seeds too early, which would have been fine, but I didn't have the pots for them yet, and I had to put them up on the shelf so the cat wouldn't eat them, and then I completely forgot about them - I'm a horrible plant mommy!!

Well, I did learn some things with this failed project.  I paid close attention to the weather and how quickly the seeds sprouted, so next year I can be more prepared.

I am also going to start hoarding pots so I can plant them when they're ready.

Also, I'd love a rain barrel!  I think I need to look into that!

Well, hope you got a little laugh out of my garden that looks like it was tended by Beatlejuice.

See ya soon!

Sunday, May 1, 2016

Smoothie Obsession


Yum!  Smoothies have been my go-to breakfast for the past month or two.  My favorite right now is strawberry and blueberry!

They are so simple to make, and they take no time at all!  Here's my super secret, oh-so-delicious recipe for a quick smoothie.

1 cup green tea (unsweetened)
1 cup vanilla yogurt (that adds the sweetness that I need)
Handful frozen strawberries
Handful frozen blueberries

Throw it in a blender, and mix til you get the consistency you want (if you don't have frozen fruit, throw in a handful of ice).

I normally buy fresh fruit every week, clean it, and freeze it for the next week.  Sometimes if I know I won't have time to prep, I'll buy frozen fruit, but I prefer to prep it myself.

Prep the fruit beforehand, freeze it, and all you have to do is take it out of the freezer and dump it into the blender.
--
Another smoothie I used to make (recipe courtesy of my IG friend @crochetnanigans) is to use the recipe above, and add carrots and kale.  Yummy!!!
--
You know something else I want/need to try?  Adding whey protein to my smoothies.  I love whey protein shakes in the morning, so I have to wonder if I can combine it with my go-to recipe.  I'll let you know how that one turns out.

How about you?  Do you smoothie?  What's your favorite recipe?


Sunday, April 24, 2016

Teacher Appreciation Roundup

As the end of the year approaches, teacher appreciation week gears up.  Let's make our teachers feel special and loved for all of their hard work!

Here are some crafts I've come up with for teacher appreciation week:


If you're into crochet, try out the V-Stitch bag, the Heart Drawstring Bag (without the heart, if you prefer, or you could add the flower from below!), or the Shell Market Bag filled with your teachers favorite candy!


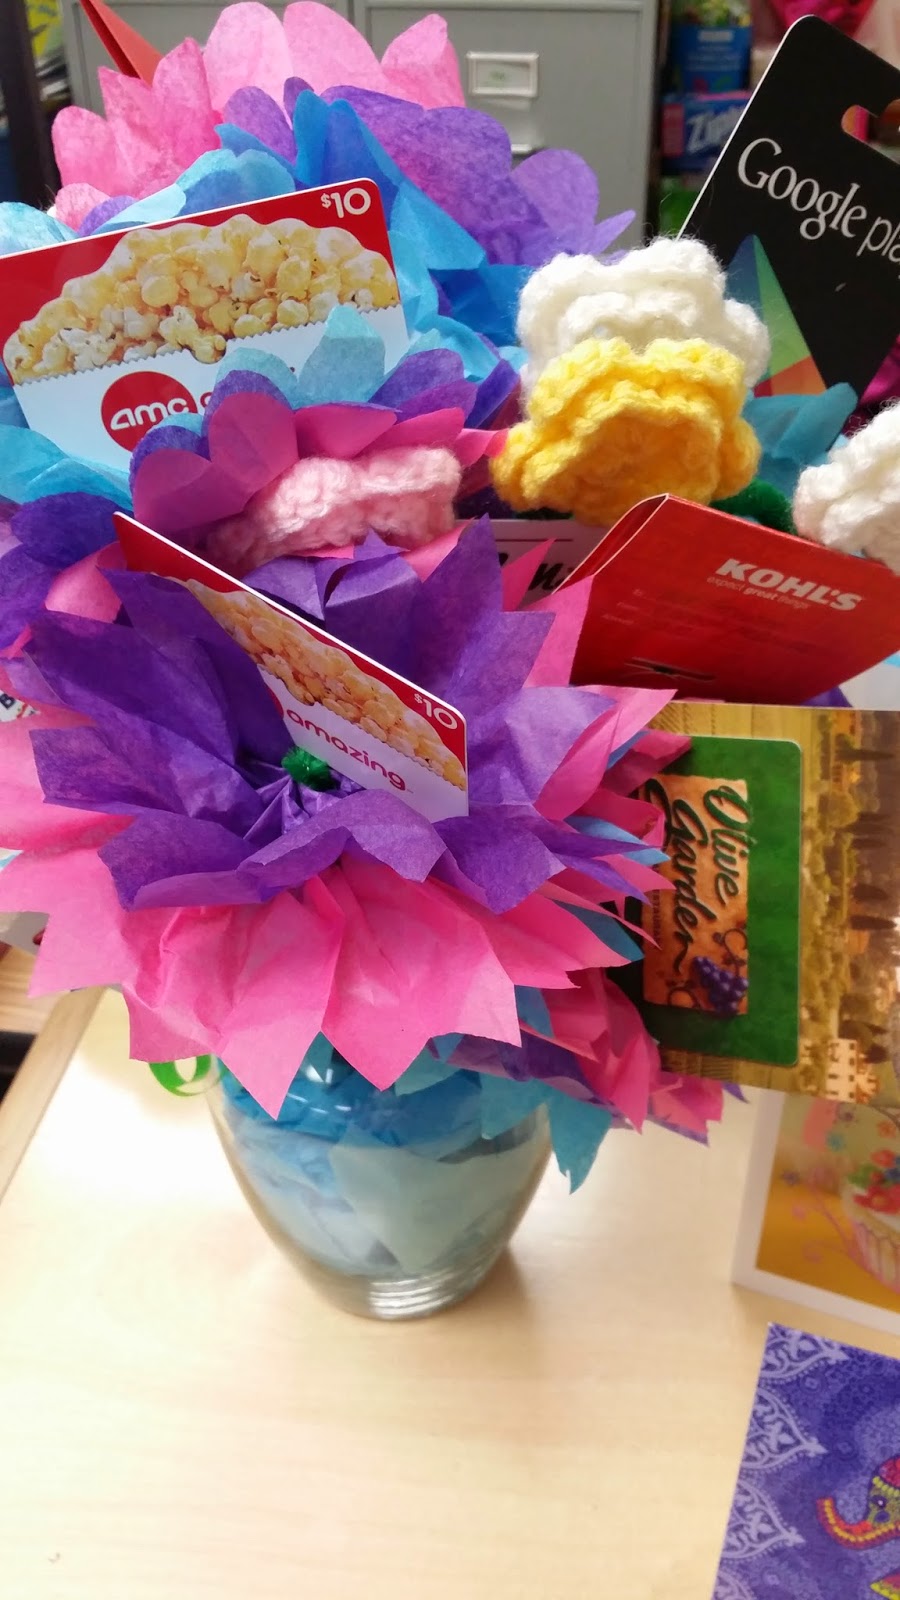
This vase of flowers doubles as a gift card holder.  Pinterest has a ton of pins on how to make paper flowers, and the crochet flower pattern is here.

Pencil/Crayon Vase.  There are some wonderful pins for those, as well.  I made one, but forgot to take a picture of it.  : /


Sunglasses pouch.  I stitched this one by hand.  Here's a little template for you.  Simply cut four pieces of your fabric, as well as two pieces of stuffing (?) And sew them together.  Here's a link to some hand sewn stitches that I've pinned.  (I didn't iron before sewing the pieces together.  Please do that!)

Summer time goodies!  In the past I've done a cup with a straw filled with some of their favorite goodies.


What if you don't have a lot of time (the end of the year really sneaks up on me!), or you just aren't feeling the crafty bug?  Try these little goodie bags.  The kids can decorate a brown paper bag, and just stick some thoughtful little somethings in. 

I'm sure there are some things I've missed, feel free to check back on previous posts, or hit up my Pinterest page.  I've hoarded tons of stuff over there that you may get some use out of.

Happy gifting!

Sunday, April 17, 2016

Ruffle Market Bag


You guys know how much I love bags, right?  I have bags to hold bags that will hold bags.  It's ridiculous.  So, here's another bag pattern.  Because I just can't get enough!

I made this bag a couple of years ago for a student teacher, when she was leaving our classroom.  I filled it full of teacher-type stuff for her new classroom.

You can get the pattern HERE.

NOTE:

  • If you want to make it wider, continue to increase the bottom to the size you want  (likewise to make it smaller, crochet only a few rounds of the bottom).
  • If you want to make it taller, keep on going with it.  It's all up to you!
Enjoy!

Sunday, April 10, 2016

New Planner Pages

In honor of resurrecting my real estate career, I decided I needed some new planner pages.  Something that would seamlessly incorporate home and work.  So, I whipped up these beauts, and I thought I'd share them with you.

B/W Planner Pages

B/W To Do List

I like that they have room for my schedule, as well as some reminders for dinner, chores, and notes.  I opted for the black and white style, in hopes of bringing elegance and simplicity to my pages.  Sometimes I feel overwhelmed by too many colors and stickers and such.  Sometimes I need simple.  These pages accomplish just that.

Overall, I am very happy with them, and I hope you are, too!  If you want them in a different color, just let me know, I can easily whip them up.

See ya!

Sunday, April 3, 2016

Be Gone, Winter Clothes!

I am so excited!  It's finally spring-time!  Winter didn't last long here, I think I wore a sweater all of four times the entire season, and tennis shoes a handful of times, but it's finally getting to the warm weather that I looove!

Living in a not-so-tiny tiny house ( we went from almost 3000 square feet of space to 1000), I have to be creative with storage solutions.

We're currently working on renovating, and incorporating storage solutions that are inspired by those tiny house shows on TV.

Until then, here's how I pack up the winter sweaters to get them out of the way.  I used a large garbage bag for the jackets, but the shirts are a different story. 

Have you heard of those bags that you can vacuum out the air, leaving a flat plastic bag full of clothes?  Those came in very handy when we moved (more moving tips to come!), and I saved them for just such an occasion.

If you can roll up the garments, I've found it will hold more!  Start at the bottom of the shirt, and just roll. 
Once you've rolled them up, stack them Tetris-style in the bag (don't over-fill!  It can rupture the bag).  I ran out of room with three shirts left, so I put them in flat on top of the rolled up shirts. 


Ta da!  Now all you have to do is vacuum out the air.  (I found a hole in the bag, so mine didn't vacuum out, but it still works great to hold the clothes so I can get them stored out of the way!

Do you have any secret tips for storing away winter clothes?

Sunday, March 20, 2016

Packing for Kids - Quick Tip

Packing for kids is the fun part of vacation packing.  You have to remember all the special things they will need to make the trip comfortable, but not over pack.

My kids have their own bags that I dig out for them to pack stuff to keep them comfortable on the trip.  Most of it is stuff for the car, but sometimes it's stuff that can make them feel more at home in the hotel.  A stuffed animal, or a special action figure.

Make sure you remember your child's special item!  It can make all the difference!

Sunday, March 13, 2016

Keep 'Em Busy

I've never flown with kids before, so I really don't have any advice.  I've heard of parents putting together a little baggie for their fellow passengers, outlining the situation, and giving out ear plugs and pieces of candy.

As for road trips, though, I have a few tips.  My kids are older now, so it's easier to travel with them.

Here are some of my tips for travelling with littles:


  • DVD player.  It's just one of those things that I have learned to love.  
  • Coloring Books and crayons - just don't leave the crayons in the car for too long!
  • Road trip games.  There are games that can be purchased at the store that are magnetic, so they can be played in the car, or you could play games like 'I Spy' or the license plate game (which I've never played, so don't ask me how).
  • Snacks.  I don't know how you feel about eating in the car, but we've tried road trips without eating in the car, and it just doesn't work.  One of my littles gets car sick, so I make sure to keep crackers and peanut butter on hand.  
  • Stretch your legs.  It may not sound like much, but leg stretching can bring renewed excitement to your road trip.  My knees get stiff (my right knee will probably need to be replaced, it's so bad, so I have to work it more than the other), and it always makes me feel better to stop and take a minute to step out of the car.
  • Music.  Make sure to bring music with you!  When we went on vacation the last time, there was a stretch when we didn't have music we cared for.  It made it a very long few hours!
That's all I can think of right now.  Check out my Pinterest board "Road Tripping" for some more ideas!


Sunday, March 6, 2016

Vacation Packing Checklist

It's March!  You know what that means?  Spring break is right around the corner, and just around the corner from that is Summer vacation!  In honor of road trip season coming soon, I am going to cover different ways to make road tripping easier with kids.  I'll publish a post each Sunday (except for Easter), so, here goes:

Are you a list maker, like me?  Someone who has to write a list to write a list?  Well, this is the post for you.  I put together a vacation packing checklist to help you get it all in order before your big trip.

I call it the Vacation Helper.  The printable has two versions, a version for one individual, and another with a grid for families.

Let me know if you think of any ways I can improve the Vacation Helper!

See ya later, and happy vacationing!


Wednesday, March 2, 2016

St. Patrick's Day Crafts

St. Patrick's Day is approaching!

Each year I like to do something small for the boys for St. Patty's Day.  Here are a few of the things I did in past years, and some new ideas.

Green Rice Krispies Treats:  I haven't made these, yet, but they are on the list this year.  I know I can buy Rice Krispie Treats, but I have never made them before, and I think the boys will love them! 
Crochet Pot of Gold:  I made these last year, and the boys still use them for various trinkets.  I've added a pattern herehere.  I filled these little pots with Rolos as the gold.


Crochet Shamrocks:  The pattern for these little guys can be found herehere.  They are great to adorn the little pots above.  They can also make a cute hair bow, or be worn somehow, so no one gets pinched!

Scavenger Hunt:  I did this one a couple of years ago, and the boys really liked it.  I don't have any printables for this one, but all you have to do is write down little riddles on slips of paper, leaving them at a couple of spots in the house.  The last, of course, led to their treat.  For their treat, I made a black velvet bag and filled it with gold coins, and had a shamrock coloring page.  I wish I could find the bags I made, but maybe I'll throw together a sewing tutorial for one!!  That would be fun!! 

St. Patty's Day Scavenger Hunt Part 2:  Have your littles search out different things that can be associated with St. Patrick's Day:  rainbows, colors (ie gold, green).  They'll have fun, and get a prize at the end!


St. Patty's Day Jewelry:  I have some large beads somewhere, that the boys will love using to make some green and gold necklaces or bracelets for their friends, or even themselves!

Whatever you do for St. Patrick's Day, have fun with it!!


Sunday, February 28, 2016

Check Out The New Shop

Beach Bird Eclectics will no longer be selling on Etsy.  I can hear the groans of disapproval, now, but if you'll hear me out...

I'm just not fond of Etsy.  I feel like it's too time consuming.  Again, I can hear other Etsy sellers groaning, but if you really wanted to sell, it would be worth the time.  Maybe they're right.  I mean, I do want to sell my products.  I just don't want to use that site any more.  I do not like paying for something that isn't paying off.  I have done a lot of research, and I have more business through Instagram and word of mouth than through Etsy or Storenvy.

Here's what I've decided.  I'm going to run my shop through Instagram and through this blog.  Yep.  Easy peasy.  Here's how it's going to work:

If you'll direct your attention to the top of the page, there is a new tab entitled "Beach Bird Eclectics".  That's the shop.  Well, kind of.  This page will have a list of all of my inventory, as well as the prices and a description.  If anything catches your eye, there's a contact form that you can use (on the main page) to order.

I will also post to Instagram {Beach Bird Eclectics} when new items come out, and reminders of where to find the items.  Ordering can even be done through IG, as well as this blog.

In both cases, I'll coordinate with you on the exact price and and send a PayPal invoice.

*I will never ask for sensitive information.  Payments will ONLY be made through paypal.*

To celebrate the changes, I'm offering 40% off of everything in the store!  Prices have already been marked down, so there's no need for a code!  This discount will be available until March 6, 2016!

I hope this wasn't too confusing!  As always, if you have questions, you can get in touch with me!  I'd love to talk with you!

See ya!

Wednesday, February 24, 2016

Yarn Projects Part 3: Tension

Good morning!  I hope you are doing well!  Today's lesson is on tension.  Not the tension you get from work, or school, but the tension you put on your yarn when making those gorgeous yarny goodies.

When I first started crocheting, my tension was ridiculous!  It's no wonder I have arthritis in my poor hand!  I would hold the yarn with a grip like a life line.

I am still a tight crocheter, but I have let up on the tension somewhat.  Here are two examples of what I'm talking about.

I totally ran out of yarn on the larger
swatch, but I think I got my point across.


These swatches are both made with the same number of stitches, the same number of rows, the same hook, and the same yarn.  The only difference in the two is the tension (and the one I ran out of yarn).

In the top swatch, the tension is so tight.  Probably exaggerated, but still, that's how I used to crochet.
In the bottom swatch I barely held the yarn.  That was difficult. 

See?  Big difference.  The tension you use in your yarn endeavors will affect the outcome of a pattern, just as much as the hook and yarn sizes.

I hope you've found this little series to be informative and fun!  I have a great time doing stuff like this, and I'm thinking of doing more crochet type posts.  What do you think?  Any ideas?

Sunday, February 21, 2016

Yarn Projects Part 2: Hook Size

Hello!!  I'm back with part two of the Yarn Projects series.  The other day I talked about yarn size, and how it can affect a project.  If you missed out on that one, check it out here.

This week, I want to show you how hook size can really do an number on your project.

Like I said in the last post, my patterns aren't specific when it comes to type of yarn or hook size.  I tend to stick with patterns that don't require a gauge.  Other patterns will specify a type of yarn and hook to work it up correctly.

Take a look at these granny squares.  They are all the same pattern, same yarn, just different hooks (the letters next to the squares are the hook sizes).


I sure hope these posts are informative for you!  I am enjoying writing them.  Is there anything else you would like to see me write about?

I'll see you guys next time for the last installment of my crochet series: Tension!

Wednesday, February 17, 2016

Yarn Projects Part 1: Yarn Size

Today, ladies and gentlemen, I would like to talk about yarn sizes. 

As you may know, I'm terrible at writing crochet patterns.  I enjoy making new things and sharing them with you, but I just can't seem to write them very well.

So, I just want to explain that {most of} my patterns are subject to interpretation.  They are completely customizable, and gauge  is not always imprtant.  That us not always the case with pattern, though.  Especially if you're making clothing.

The photo below shows how different yarns can work up very differently.


These circles were made using the first five rounds of the pattern from my HDC Bag, and each one was made with a 4.5mm hook.  The only difference in each I'd the type of yarn.

{I don't know the type of yarn for the green circles, one is thin, the other chunky.  The blue and white is 100% cotton, the purple I'd 100% acrylic.}

As you can see, these circles are all different sizes, and this will affect your yarny  projects.

For sweaters, or such, the pattern will specify the type of yarn to use, so the correct gauge is achieved.  For projects like the ones I write up, you can adjust the patterns to accommodate your yarn size, making the finished product the size you want.

*I started out writing this post with yarn size in mind, and it exploded into a three part article!  The next post is going to be about hook size, I hope you'll stop back by for that!*

Sunday, February 14, 2016

Happy Valentine's Day


Hi, everybody!  Just wanted to wish you all a Happy Valentine's Day!  

See ya on Wednesday!!

Wednesday, February 10, 2016

Yarn Spinning: UGH!!

I made the niddy noddy
all by myself!  I also have a
"mini noddy"


A year ago (maybe more), I purchased a drop spindle set.  I had big intentions of learning to spin my own yarn.  {I am constantly in pursuit of more to learn}

I learned to keep my
hair in a pony-tail
while spinning.  :/


Fast forward to the end of January.  I pulled the spindles out, unwound the roving, and turned on YouTube (gotta love all the educational videos).
Verdict?  Yarn spinning sucks.  Please don't get me wrong.  I am not criticizing anyone who spins, on the contrary, I admire them!  Oh, how I wish I could spin such deliciously beautiful yarn, such thin, glorious yarn.

That's why, even though I am terrible at it, I am not giving up.  I don't know exactly what to call it, OCD, determination?   Whatever it is, I have to complete something.  I have to master it.

This is some of the batt I spun up.
I have big plans for it.  Let's hope
it turns out!

I have scoured the internet to figure out what I'm doing wrong.  I have found that one of the batts I worked with was more for art yarn, so my results were right on with the ones I found online.  One of my IG friends, @flowerchildfibers, has been so great to give me some tips and encouragement, also.  That has helped so much!

I'm going to keep trying, and I'll report back soon!!

-------------------------------------------

Rarely will I go back and rewrite a post when my opinion or results on a subject change.  This blog is more in real time... So, here's an update on the spinning (updated before it was even published, hih.  Maybe a new record).

I saved a bunch of the batt and roving that I accidentally pulled off when I was learning to spin.  While I was waiting on my new fibers to arrive, I picked up the spindle and bit of fluff and made up some more yarn.

It made for extra practice, spinning two different fibers together, and adding extra fiber (which was a problem I ran into with the first couple of go's).

The new verdict?  Approved.  I had a great time spinning and coming up with new looks for the fiber.  I wasn't as stressed about messing up the beautiful batt that I started with the other day, because it was only pieces, and I was not as rushed to get a result.  I have to learn to ply, but that's a post for another day.

I think this activity is a keeper!